
Heavy Duty Stake Grill for Camping: Setup & Care

Table of Contents
- Why a Heavy Duty Stake Grill Belongs in Your Camping Kit
- What to Look for in a Heavy Duty Stake Grill for Camping
- Campfire Stake Grill Setup: Step-by-Step
- Campfire Grill Temperature Control and Adjustable Height
- How to Clean a Campfire Grill Grate After Cooking
- Stake Grill Troubleshooting: Stability, Wobble, and Rust
- Conclusion: Cook Better Over the Fire
- Frequently Asked Questions
Last Updated: October 8, 2026
Why a Heavy Duty Stake Grill Belongs in Your Camping Kit
A heavy duty stake grill for camping solves one problem flimsy folding grills never do: it stays put.
Campfire cooking rewards simple tools. A stake grill is a steel ground stake with a grate that mounts on top, letting you cook over an open fire at a height you control.
Most guides treat stake grills as a novelty.
Below, we'll cover how to choose stake length and grate size, set up safely, control heat, clean it, and fix the wobble and rust that shorten cheap grills' lives.
What to Look for in a Heavy Duty Stake Grill for Camping
Buy for ground conditions and load, not looks. Three specs decide performance: how deep the stake drives, how much surface the grate gives you, and how much steel you'll carry. Most shoppers compare grates by cooking surface alone and end up with a grill that leans the first time they set a Dutch oven on it.
Stake Length, Diameter, and Ground Penetration
Stake length and diameter determine holding power. A longer, thicker stake drives deeper and resists sideways pull from a heavy pan. Aim for at least 8 to 12 inches of steel buried in firm ground, an 18- to 24-inch stake for typical campsites where the top few inches are loose duff or ash.
Diameter matters as much as length. A stake under about 3/8 inch will flex or bend when driven with a mallet or pried back out; 1/2-inch stakes hold up to repeated driving and stay straight. Look for:
- A pointed, welded or forged tip that drives cleanly instead of mushrooming
- A shaft that stays straight after being hammered, not one that bows on the first trip
- A head or cap you can strike without deforming the top
- A welded collar or stop that keeps the grate from sliding down into the coals
Soft, sandy, or ash-filled ground is the enemy. Drive deeper or move to firmer ground near the fire ring. A stake that only bites the top layer will lean the moment you rest a Dutch oven on the grate, and a longer stake solves that better than hammering harder on a short one.
Grate Size, Steel Construction, and Load Capacity
Grate size sets your cooking capacity. A wider grate feeds more people but needs a sturdier stake to stay level.
Solid round bar beats thin wire every time. Bar stock in the 1/4- to 3/8-inch range holds heat, resists sagging, and won't cut into food.
Load capacity is the spec almost nobody publishes, so estimate it yourself. A 10-inch cast iron skillet weighs around 5 pounds empty and 8 or 9 pounds with food; a Dutch oven runs heavier still.
Weight vs. Durability: Finding the Right Balance
Weight and durability trade off directly. Thicker steel lasts longer and holds heat better, but you feel every extra pound on the trail. A heavy-duty stake grill with a large grate commonly lands in the 5- to 10-pound range; a compact backpacking version can come in under 3 pounds.
Use this framework:
| Your Situation | Priority | What to Choose |
|---|---|---|
| Car camping, family trips | Load capacity | Heavier steel, larger grate, longer stake |
| Backpacking, remote hunts | Packed weight | Lighter stake, compact grate, shorter shaft |
| River guides, group cooking | Durability | Heavy-duty steel, welded frame, wide grate |
| Weekend fire pit use | Stability | Mid-weight, swing-away design |
For most campers, a mid-weight collapsible grill hits the sweet spot: heavy enough to stay stable, light enough to pack without complaint. The deciding question is how far you're carrying it. From the car to the fire ring, buy heavier and sturdier; several miles in, trade load capacity for a stake and grate you can actually carry.
Material, Finish, and Corrosion Tradeoffs
Heavy-duty construction gets thrown around loosely, so know what you're buying. Most stake grills are carbon steel or stainless steel, and the choice affects weight and upkeep.
- Carbon steel is strong, holds heat well, and takes a seasoning like cast iron, but it rusts fast if left wet. It needs oiling and dry storage.
- Stainless steel resists rust with far less fuss, but it's typically heavier and more expensive, and lower grades can still spot in coastal or humid conditions.
- Plated or painted finishes look good new but chip at the welds and drive points, and once the coating fails, corrosion starts underneath.
Weld quality is the tell: clean, full-penetration welds at the grate frame and stake collar outlast spot welds every time. If you cook often, a bare carbon steel grate you season and oil will outlast a cheap coated one that rusts from the inside out.
Campfire Stake Grill Setup: Step-by-Step
Campfire stake grill setup takes about five minutes on firm ground. Get the order right and the grill holds steady all night. Most guides stop at "drive the stake and cook," which is why first-timers end up with a leaning grate and a scorched dinner. Here's the full sequence, including the positioning and safety steps product listings leave out.
Before You Drive the Stake
- Check the fire rules for your site. Many public campgrounds require an existing fire ring or raised fire pan, and some ban ground fires entirely during dry periods. Confirm before you unpack.
- Pick firm, level ground a safe distance from the fire ring, far enough that you're not standing in flames to tend food, close enough that the grate reaches the coals.
- Clear rocks, roots, and debris from the stake path so the shaft drives straight.
- Set the fire first if you can. A bed of coals takes 20 to 30 minutes, and you want the grill ready when flames die down.
Driving and Anchoring the Stake
- Drive the stake straight down with a mallet or the flat of your boot, aiming for at least 8 to 12 inches of buried steel. On soft ground, go deeper.
- Check for wobble by pushing side to side before mounting anything. If it moves, pull it and drive again in firmer soil.
- Slide the grate onto the stake and lock it at your starting height, well above the flames.
- Test the swing motion with an empty grate before adding food.
Fire Safety and Low-Impact Practices
A stake grill doesn't change the basics of responsible fire use, and they're worth repeating because most gear pages skip them.
- Keep the fire small and contained. Use the existing ring or pan, and never build a fire under low branches or on dry grass.
- Never leave a cooking fire unattended, and keep water or a shovel within reach.
- Let coals burn down before cooking. Flames flare and scorch; steady coals give you control.
- When you're done, drown the coals, stir the ashes, and drown again until everything is cold to the touch before you leave.
- Pack out ash and debris where required, and leave the site looking as you found it.
Takedown and Packing
Takedown reverses the process. Let the grate cool completely, coals stay hot a long time, lift it off, pull the stake, and wipe both down before storage. A locking handle keeps the grate from swinging loose in your pack. Store both dry and check the stake tip for bends before the next trip.
Campfire Grill Temperature Control and Adjustable Height
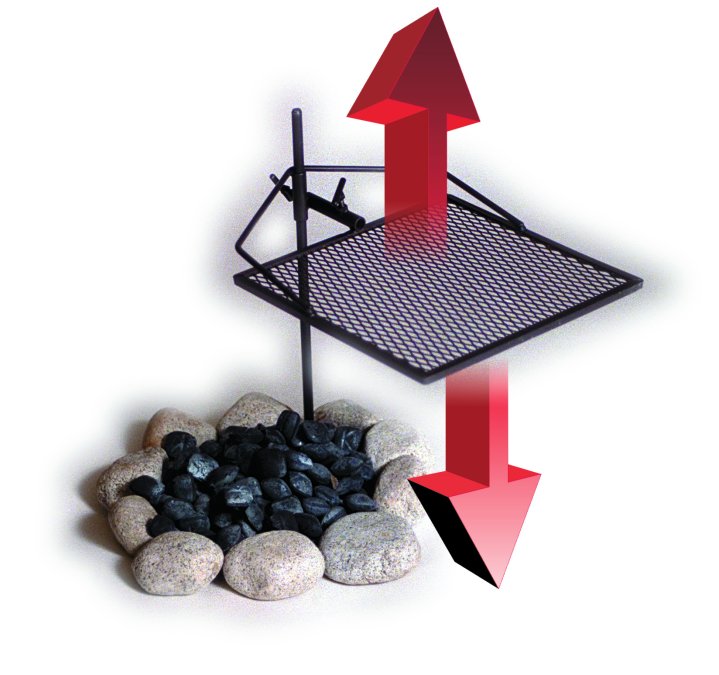
Campfire grill temperature control comes down to one lever: height above the coals. Move the grate up to cool the cooking surface, down to sear.
Most open-fire cooking happens in three zones:
- High heat, grate close to coals: searing steaks and burgers
- Medium heat, mid height: sausages, vegetables, fish
- Low heat, raised high: keeping food warm or slow-cooking
An adjustable height system lets you change zones without touching the fire, the real advantage of a swing-away design. Rotate the grate off the heat to check food, then swing it back without moving the stake or burning your hands.
Wood fire and charcoal behave differently, so watch the coals, not the clock. Gray, glowing coals give steadier heat than leaping flames. If grease flares, raise the grate and let the fire settle.
How to Clean a Campfire Grill Grate After Cooking
How to clean a campfire grill grate: scrub it hot, oil it, and store it dry. That two-minute routine adds years to any grate.
Follow these steps:
- While the grate is still warm, brush off food residue with a wire grill brush.
- Wipe the bars with a lightly oiled cloth to block moisture.
- Let the grate cool fully before removing it from the stake.
- Wipe the stake down and check the tip for bends.
- Store both in a dry bag or case, never damp.
Skip harsh chemical cleaners on a campfire grill. They leave residue that ends up in your next meal. Heat, a brush, and a thin coat of oil handle almost everything.
Stake Grill Troubleshooting: Stability, Wobble, and Rust
Stake grill troubleshooting starts with the two failures that matter: a loose stake and surface rust. Both have simple fixes.
If the grill wobbles, the stake isn't biting. Pull it, move to firmer ground, and drive it deeper. Loose, ashy soil near an old fire ring is the usual culprit.
Rust is a maintenance issue, not a death sentence.
If a weld does crack, stop using the grate over a live fire. A repaired or replaced grate is far cheaper than a lost dinner or a burn.
Conclusion: Cook Better Over the Fire
A heavy duty stake grill for camping turns an unreliable fire-ring setup into a stable cooking station you can trust. The rules are simple: match stake length and grate size to your ground and load, drive deep, control heat with height, and dry your gear before storage.
That's exactly what we build at AdjustaGrill. Our stake grills use a patented adjustable design with precise temperature control and swing-away motion, handle Dutch ovens and cast iron, and collapse for easy transport.
Shop now and cook better over the fire on your next trip.
Frequently Asked Questions
How do you set up a stake grill over a campfire?
Clear a level spot near your fire pit and drive the ground stake into firm soil at a slight angle away from the flames. Slide the grate onto the stake and lock it at your preferred height. Build your fire, let it burn down to coals, then swing the grate over the heat. Test stability by pressing down on the grate before adding food. A properly seated stake should not wobble.
How do you keep a stake grill stable on uneven ground?
Stability starts with soil choice. Look for packed dirt or gravel rather than loose sand or soft mulch. Drive the stake deep into the ground. If the soil is soft, angle the stake slightly and pack rocks around the base. Some campers carry a small mallet for easier driving. Check for wobble before cooking and re-seat the stake if needed.
How do you control cooking temperature on a stake grill?
Temperature control comes from two adjustments: grate height and fire management. Raise the grate to lower the heat and lower it to increase heat. For a wood fire, wait until flames die down and coals form for steadier temperatures. Add or spread coals to fine-tune heat zones. A grill with an adjustable height mechanism makes these changes quick and safe during cooking.
How do you prevent a stake grill from rusting?
Clean the grate after every use and dry it thoroughly before storage. A light coat of cooking oil on the steel helps block moisture. Store the grill in a dry bag or case rather than leaving it exposed to rain or dew. If rust spots appear, scrub them with steel wool, re-season with oil, and the grill will be ready for the next trip.
Leave a comment